> port list <tab>
_port_caching_policy:12: bad math expression: operator expected at `16777234\ni...'
Today, there’s a single hit on google for “_port_caching_policy”, and it’s the function on github. Which, fair. It’s not especially interesting, just a very basic comparison between file modification times to see if the cache should be updated or not.
stat -f%m . > /dev/null 2>&1
if [ "$?" = 0 ]; then
stat_cmd=(stat -f%Z)
else
stat_cmd=(stat --format=%Z)
fi
_port_caching_policy() {
local reg_time comp_time check_file
case "${1##*/}" in
PORT_INSTALLED_PACKAGES)
check_file=$port_prefix/var/macports/registry/registry.db
;;
PORT_AVAILABLE_PACKAGES)
check_file=${$(port dir MacPorts)%/*/*}/PortIndex
;;
esac
reg_time=$($stat_cmd $check_file)
comp_time=$($stat_cmd $1)
return $(( reg_time < comp_time ))
}
I was pretty impressed to find docs on debugging completions, and at various points used all three shortcuts( alt-2 ctrl-x h
, ctrl-x h
, and ctrl-x ?
).
It was quickly evident that stat
was returning the full details, but the code was expecting a single number from each execution:
stat '--format=%Z' /opt/local/var/macports/sources/rsync.macports.org/release/tarballs/ports/PortIndex
reg_time=$'device 16777234\ninode 19150376\nmode 33188\nnlink 1\nuid 0\ngid 0\nrdev 0\nsize 21393774\natime 1689623078\nmtime 1689614240\nctime 1689623082\nblksize 4096\nblocks 41792\nlink '
stat '--format=%Z' /Users/daniel/.cache/zsh4humans/v4/cache/zcompcache-5.9/PORT_AVAILABLE_PACKAGES
comp_time=$'device 16777234\ninode 16062342\nmode 33188\nnlink 1\nuid 501\ngid 20\nrdev 0\nsize 590845\natime 1689287896\nmtime 1689273088\nctime 1689273088\nblksize 4096\nblocks 1160\nlink '
_port_caching_policy:12: bad math expression: operator expected at `16777234\ni...'
Ok, so the behavior of stat
has changed. Maybe old code that needs to be updated for Ventura? Except that the code already handles the BSD-flavored stat, as well as the coreutils version.
And the stat
command in my terminal doesn’t behave like either of those, because … it’s the zsh/stat builtin module, with output like this:
device 16777234
inode 1129680
mode 16877
nlink 7
uid 501
gid 20
rdev 0
size 224
atime 1689639115
mtime 1689639115
ctime 1689639115
blksize 4096
blocks 0
link
Prominent in the documentation:
The same command is provided with two names; as the name stat is often used by an external command it is recommended that only the zstat form of the command is used. This can be arranged by loading the module with the command ‘zmodload -F zsh/stat b:zstat’.
zstat +mtime
I was partway through a PR to add a third case, preferring to use zstat
if it’s loaded. It makes sense to me that using the shell builtin would be preferable, but I don’t know how common it is to have it loaded. So I don’t think it can completely replace the if / else that determines stat_cmd
. And any theoretical performance win from an in-process syscall (vs executing the separate binary) is going to be invisible against cost of reading the (currently) 580 KB cache file.
if (( $+builtins[zstat] )); then
stat_cmd=(zstat +mtime)
else
# existing bsd vs coreutils switch
fi
I’d written and tested a change, and was working on the rationale for the commit message.
zsh/stat
so that it shadows stat
?I was fairly late to switch to zsh, and when I finally did, zsh4humans v4 had a compelling sales pitch:
A turnkey configuration for Z shell that aims to work really well out of the box. It combines the best Zsh plugins into a coherent whole that feels like a finished product rather than a DIY starter kit. If you want a great shell that just works, this project is for you.
I wasn’t interested in the SSH-based features, and turned them off. I made some basic changes to the config, and it’s been working great for me. So much so, that I never switched to the v5 branch, and was disappointed to read the author has moved onto other things. I certainly understand though, since it looked like many “Issues” raised ended up with him effectively volunteering his time to help folks debug their shell configurations.
So when I tracked down the zmodload zsh/stat
in main.sh and then found it was fixed in v5 almost two years ago, it felt like this whole journey was self-imposed.
There were many spots where zsh/stat
was loaded as recommended, so that it only adds the zstat
builtin. If zsh
has a debugging feature for showing where a module is loaded, I never found it. Instead it was looking through the various config files, and using a multi-file grep, which was hindered by the fact this specific zmodload
command used globbing features to load several modules at once, and it wasn’t a direct textual match for zsh/stat
.
Anyway, if your code is calling stat
with -f
or --format
, and you’re unexpectedly getting all the fields, you might be inadvertently using zstat
.
I guess it’s possible that someone, someday, will also have zsh/stat
fully loaded, and the completion script will break on the same line. If so, maybe it’s worth filing an issue? Until then, it feels like a misconfiguration of my environment, and not worth handling in this obscure location.
Add me to the long list of people who’ve “inherited” a security system (actually two) in their house, but aren’t (yet?) willing to pay for a monitoring service.
What did we do with the unknown system in our house? Ignore it! Believe it or not, this strategy only works for so long. Alarm systems don’t like to be ignored when they’ve got an error, and ours has had several cases where it’s triggered a (repeating) audible fault:
*2
), and then have to do it all over again the next day because once the house warmed up during the day, the battery voltage rose, reported it was “fine” and the error condition cleared itself. At least until the next morning 😭This fault -> cleared -> fault cycle was annoying. Could we just maintain a constant temperature 24/7 in the house? Don’t think I didn’t consider it. Instead, I “fixed” it by unplugging the battery pack 🙈. Once it stopped “recovering” every day, I acknowledged the fault one last time and moved on.
Why put up with 👆? The stupidest reason: when a monitored door or window opened, the panel emits a chime. We got used to that - so much so that when I open a door and don’t hear the chime it feels weird. But I also harbor hope that I’ll get the alarm system working some day. The first step is being able to arm and (more importantly) disarm the panel.
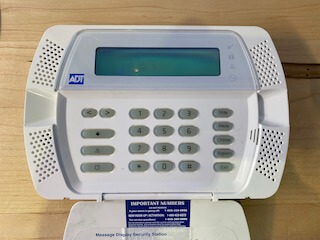
I was able to find documentation about our specific panel (SCW9047). But you need to know the secret codes in order to do anything interesting. The Installer Code allows you to view & change the configuration, and there are codes (like the Master Code, used by the homeowner) that are used for disarming the alarm. We didn’t know any of them.
The panel is shipped from the factory with a default installer code. Our panel is manufactured by DSC, but it has ADT branding and they keep sending snail mail to our address with an addressee of “Former ADT Customer”. The internet tells me that ADT is pretty reliable about changing the installer code, and that they’re not inclined to share it with homeowners. I never actually contacted them because it didn’t seem like a good use of my time. I did try the factory default code, which didn’t work (surprise!)
Sidenote: I suspect their business model is similar to subsidized cell phones. The consumer receives a discount up front in exchange for a commitment to pay for the service for a certain amount of time, at which point they’ve been paid back and the consumer should own the hardware. It took far too long for carriers to agree to unlock cell phones once the contract was up, and as a non-party to the original agreement, it feels like bullshit that there’s equipment in my new house that I don’t have full access to.
It may be related to FCC rules for alarm systems running on 433 MHz. §15.231(a)(5) has an exception for “professional installers”, and I could imagine a scenario where they justify a refusal to share the installer code due to that restriction.
Except… I do have access. I have full access, and it’s possible to just reset the hardware and set it up from scratch. Why not do that?
Someone took the time to enroll all of the wireless sensors. If a door or window is open, the panel can tell me which one, by name and location. If you can’t tell, I’d been working on the lazy approach. I really didn’t want to re-enroll all our sensors, and <whatever other setup>. I’d much rather just change the installer and master codes.
Ok, so it’s not broken, but it isn’t really “working” either. I finally found the enthusiasm to do more. A year ago, or even 3 months ago, I didn’t have the knowledge necessary for today’s progress. It was nice seeing the puzzle pieces come together.
This panel uses a 16.5V AC power supply. I really didn’t want to crawl around in our basement to unplug and pull the transformer out, but I did want to move the panel to my desk. I remembered that 7.2V DC battery inside the alarm panel, and reasoned that if the panel can run from battery backup, I should be able to plug it into my bench power supply and fake it.
Wrong! 7.2V DC didn’t do squat. The battery pack is 6x AA cells, the internet tells me they’re ~1.4V fully charged, so I bump the supply up towards 8.4V. Still nothing 😢 Subsequent experimenting (after fetching the AC transformer) shows that the panel needs the AC supply to start, and then it’ll happily run from the battery connector. 🤷♂️
As you might expect from a commercial product, it has some advanced behaviors. At first, it boosts the battery’s voltage up to 12V DC output voltage (the spec for the AUX +/-). After some time there’s an audible click, and the voltage drops down to match the “battery” supply voltage. My situation is artificial, I don’t think it matters for what I’m trying to do, but I found it confusing and think it’s worth documenting.
Digression: I recently purchased the Saleae Logic 8, using their enthusiast pricing - almost entirely due to this @jaydcarlson tweet. I still have a lot to learn about it, but it shows up later in my tale.
In the last week or two, I’d been thinking a lot about serial protocols. Mostly, I’d been using a variety of different devices to read UART serial debugging output for work on a pull request for esphome.io, and doing a little bit of writing / control over the TX.
The manufacturer supports programming the panel with custom software, and the SCW9047 Installation Guide has a page recommending using a PC-Link cable and their DLS software. The documentation shows the 4 pin header to connect to, and recommends using a specific USB to Serial adapter if your computer doesn’t have a DB-9 / RS-232 port built in. I’m able to find discussion about making your own PC-Link cable, but I found it surprisingly hard to find a pinout that I trust. Here’s where I ended up:
There’s an indication on the board of which way to plug the connector in, and I found references that if you plug it in wrong it won’t work (as expected for TX-TX / RX-RX) but won’t break anything. However, I never found out what the signal voltage levels are. Wikipedia tells me RS-232 can range up to ±25V, and so I’m pretty cautious at this point. The only device I have that’s safe to plug into a full voltage RS-232 signal is the Saleae (ref). But when I do, there’s zero activity. In retrospect, that might have been because I wasn’t willing to bridge pins 2 & 3, instead I was only using pin 2 as ground. Maybe pin 3 is an active low signal that needs to be shorted to pin 2 in order to enable serial debugging/logging output. At the time, I believed I needed the DLS software to drive the conversation, and it was quiet simply because I hadn’t sent any data to the board.
I contemplate buying the recommended USB to Serial adapter. However, at this point I take a little time to think and realize that without the software (or documentation of the serial protocol) even if I’m able to transmit to the alarm panel, I probably won’t get very far.
The alarm has spots for two additional headers, but they were empty: A four pin and an eight pin. I started with the four pin header (and, spoiler, never looked at the 8 pin). Using my multimeter, I found the ground pin (#4) and then read 3.3V on each of the remaining. Jackpot! Just a couple days previously I’d been looking at the Microchip PIC24 microcontroller on the Bus Pirate, and seeing a 3.3V line on the alarm panel had me very hopeful it was connected (possibly directly?) to the dsPIC33F that I see on the board.
I’ve done some soldering kits (ex: I’m partway through the 555SE kit and am having a blast). However this is my first time soldering something on a commercial project, and even though I’m nervous I rationalize that even if I totally ruin it, it’s not like the alarm was doing us a lot of good as-is.
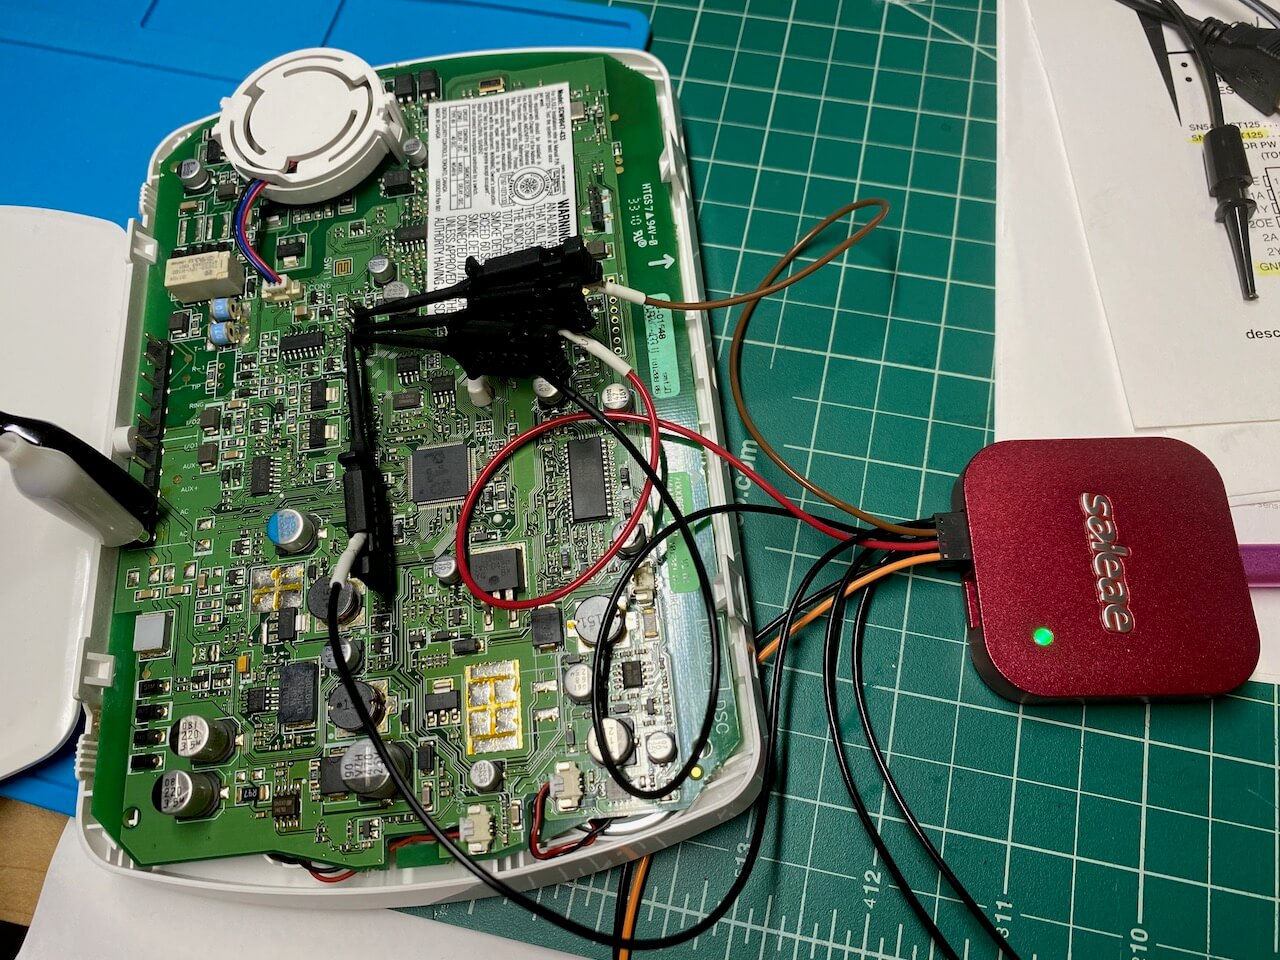
I connect up the Saleae, and take some traces. Pin 1 is a constant 3.3V supply. Pins 2 and 3 both have activity. I’ve been fixated on finding a serial link, and assume I’m seeing both RX and TX from some components, but I cannot figure out the right settings to get a coherent decoding:
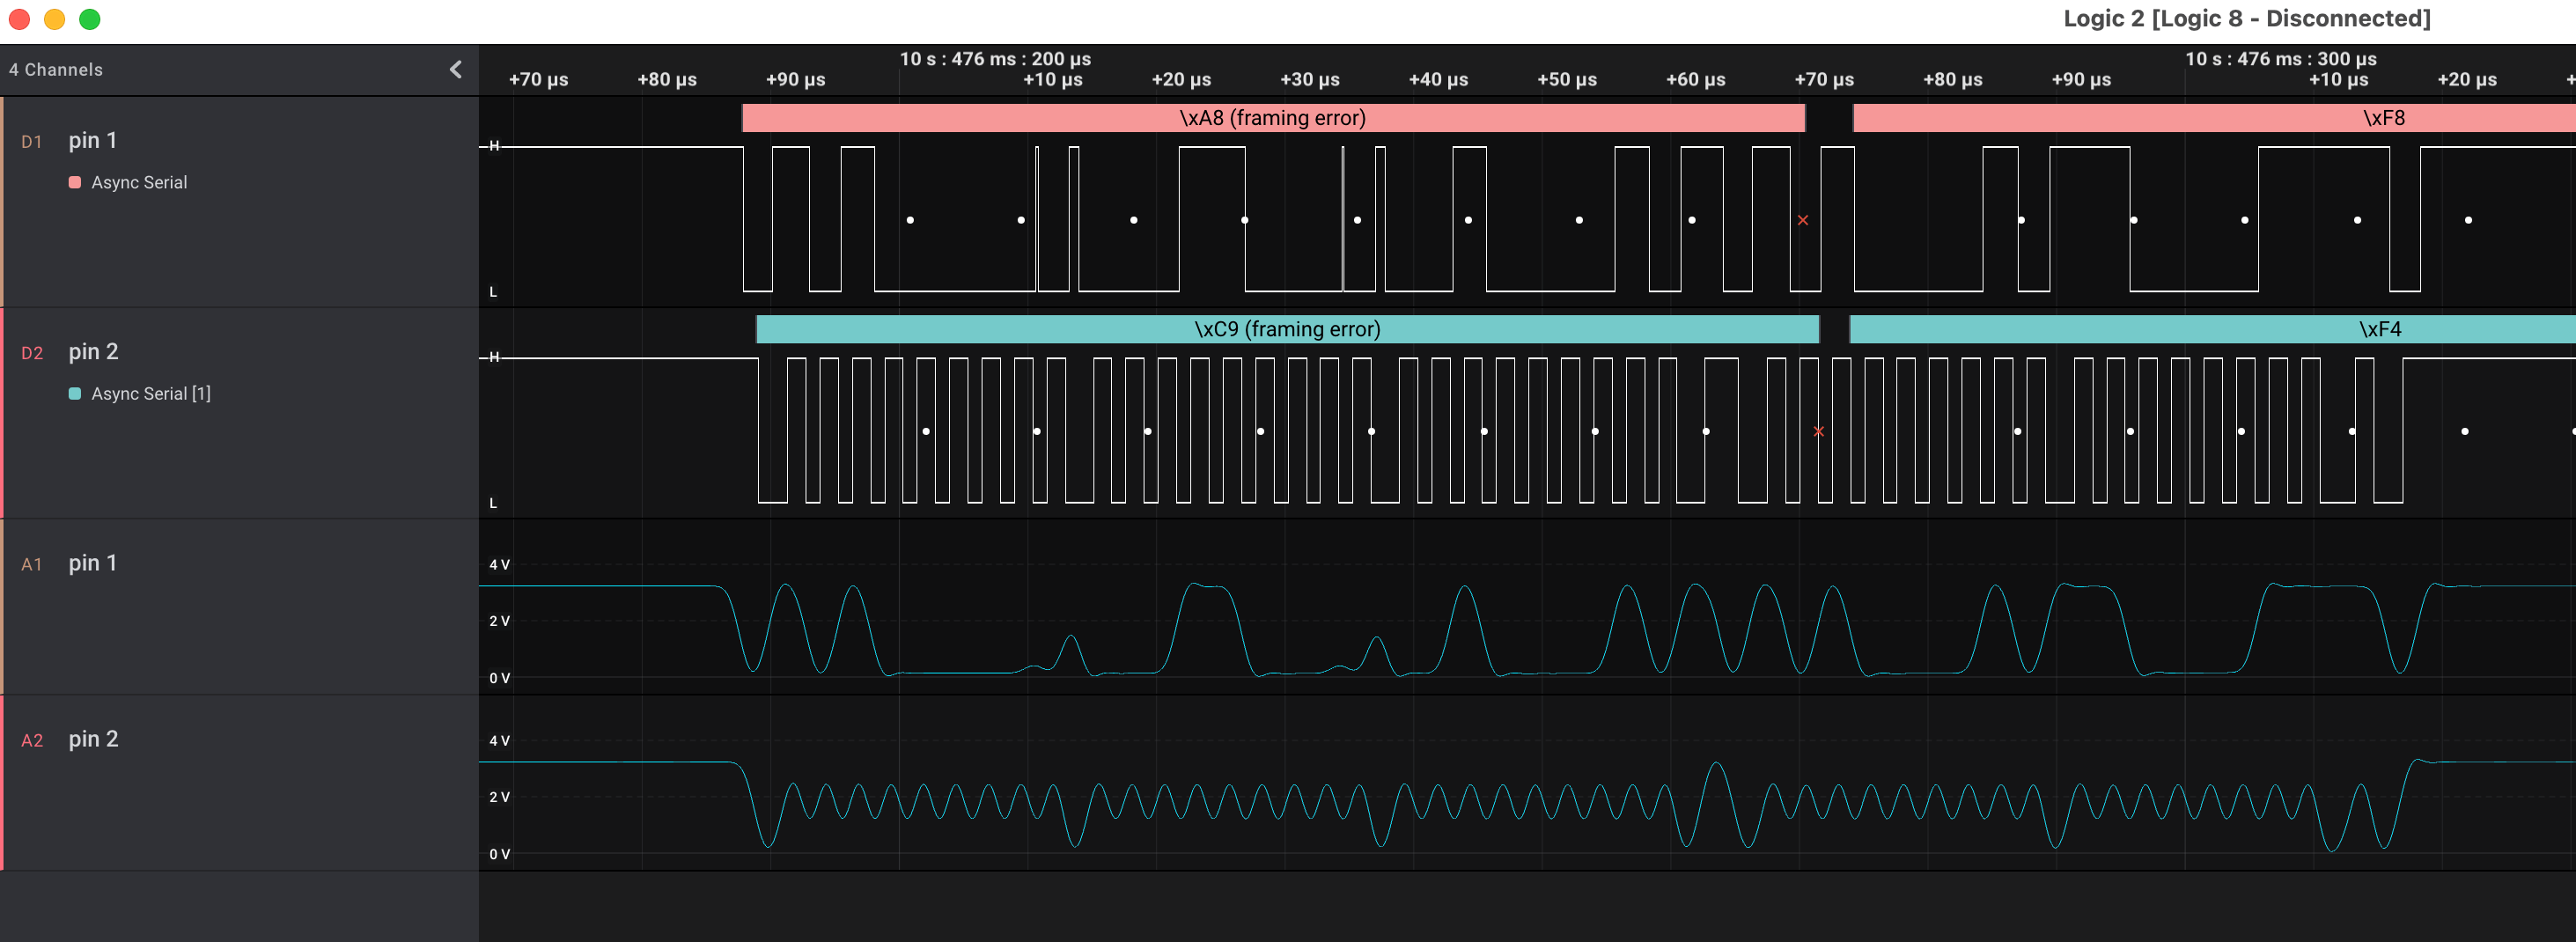
Like I said, I haven’t used the logic analyzer for much, and this is a new hobby. However, having added the analog readings to the display, I realize that “pin 2” 👆 looks suspiciously like a clock signal. In retrospect, it’s visible in the digital too, but 🤦♂️
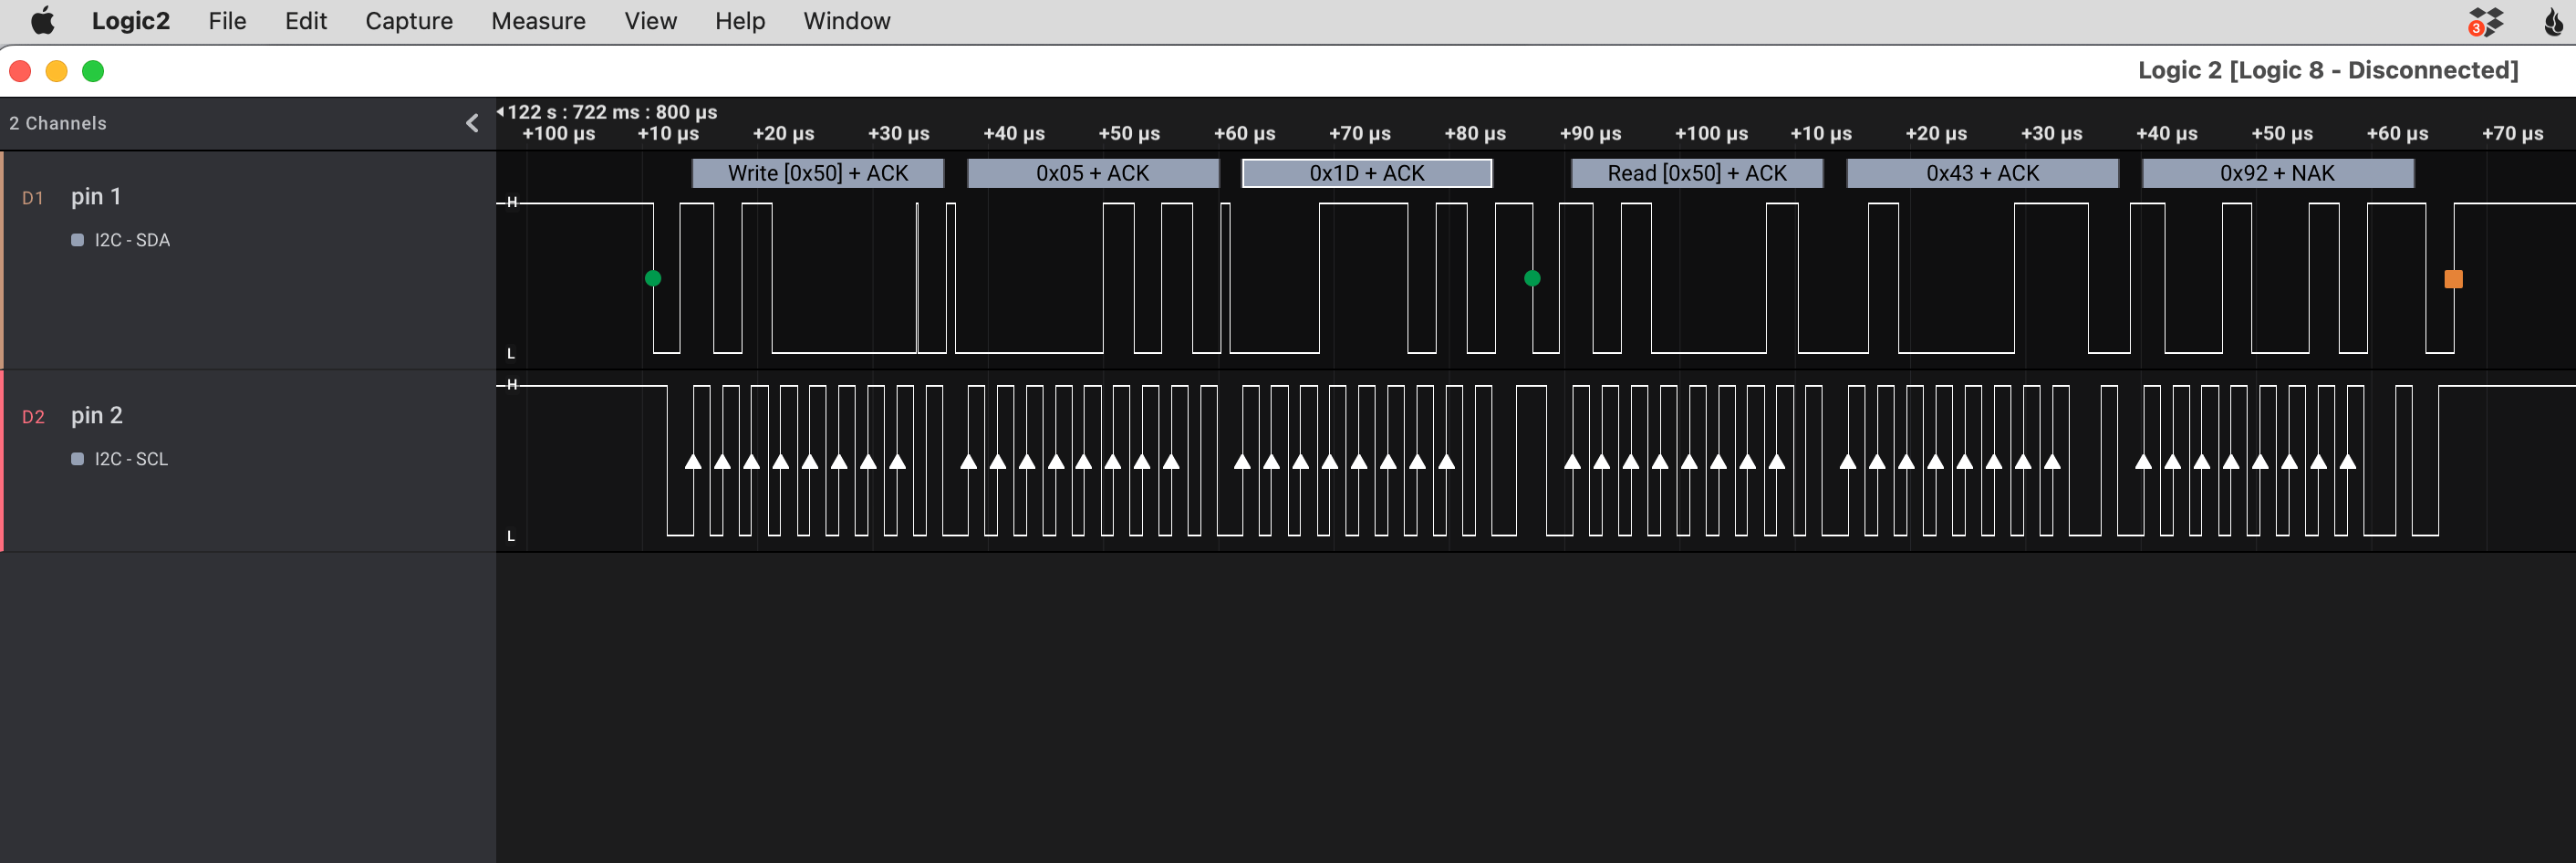
Ok, so it’s I²C. I’ve done some work with an I²C component already, so this is a puzzle piece I recognize. The I2CDevice class in esphome.io has a very consistent pattern to communicate with I²C chips: write a command (+ optional data) to an address, and then read the response from that address.
What I see is every single message is addressed to 0x50
and every message is a write followed by a read. Step one, google i2c address 0x50
, and TIL there’s a website that shows components with a specific address.
The first suggestion is an EEPROM, and I quickly spot an SO-8 labeled 24C64WP on the alarm circuit board. I almost don’t need to confirm the address that chip uses, this feels right.
It really was a lightbulb moment: the realization that I’ve (probably) got access to every single persistent storage read & write that the microcontroller makes, and I can see them on a timeline graph.
Well, sure. The EEPROM is full of binary data, 8 KB of it. There’s a large block of activity after boot, but then it quiets down. How do I provide meaning to the bits moving back and forth?
🤔 what are the odds that the code that checks an Installer Code attempt (I’d been running down a list of “common” installer codes) reads the actual Installer Code during the comparison? It’s got to be worth a shot… It’s the kind of easy-to-make coding error that the various Stripe CTFs drilled home for me.
The expected code is 4 digits long. There are exactly two write/reads with a response length of 4 bytes at the moment I press the last button in my guess, and they’re both four decimal digits (no hex): 0x4392
and 0x0602
.
I can scarcely believe it. I try the first one, and I’m in. Days later, I still can’t believe that simply by connecting 3 wires to a very inviting looking location, the alarm panel has told me what the secret code is.
I achieved my goal! I can now selectively reprogram our system, using the comprehensive documentation in the Installer Guide.
After the elation subsides, I start to wonder about the security. I think it’d be almost trivial to build a device that spams the I²C command to read that specific memory location and display any result received. The wikipedia page for I²C tells me the protocol supports multiple controllers on a single bus. Could you enter someone’s house, pop the alarm panel off the wall, and take the installer code after a momentary contact to these header slots? Any firmware changes or model differences might require looking in multiple memory slots, but it seems like the problem space goes from 104 to something a lot smaller.
I haven’t checked if the installer code will disarm an active alarm. That’s okay, just pull the master code instead and/or additionally. Having unencrypted, un-obfuscated secrets read from memory on demand, combined with an oracle for whether or not I’ve found the correct bits means I think it’s easy to find the location (and contents) of those secrets.
Now, this blog post moves into speculation. It’s interesting to ponder given my training on computer security, although I’m not going to do it justice here. I think a solution to this physical insecurity has two parts.
The Hackaday teardown of a SCW9057 pointed out the first half: the alarm panel has a switch that’ll detect when it’s pulled away from the wall. So the software has a method to detect physical tampering. However, “tampering” is also how the installer configures the device through PC-Link, or how the panel’s battery is replaced. The alarm panel cannot have a fatal reaction to tampering, like you might with a credit card reader (where it’s reasonable to wipe the private key material if the case is opened).
The second half is remote monitoring. If, and I don’t know if it’s part of the protocol used, the monitoring service can identify and handle untrustworthy alarm panels, I think it’s possible to provide pretty good security. A panel is trustworthy until it’s tampered with, and then the state is unknown. You’d need some out-of-band method to restore trust in it — an alarm panel reporting “just kidding, false alarm, they entered the Installer code” is nowhere near sufficient. A phone call to the homeowner who provides a passphrase acknowledging the panel was removed and things are fine seems closer, but your home owner may not be able to detect compromised hardware.
I think there’s still a hole in the system:
Since the alarm had no chance to alert the monitoring service, if the tampering fault can be cleared before reconnecting, the alarm panel believes the monitoring service is aware of the issue.
Can that be solved? Maybe something like a write-only, increment-only tamper counter. When the panel checks in with the monitoring service it notices the discrepancy, and can take action. If the panel never checks in again, the service can also take action.
Is this just how embedded programming works? Secret values sent in the clear from storage to the microcontroller? I suspect often the answer is yes. It’s possible to do better, and I’ve got a couple ATECC608 breakouts I’ve been meaning to play with. As a (primarily) iOS developer, the opportunity to poke directly at a Secure Element is interesting. If the alarm panel had one of these chips, the microcontroller could securely ask “is the installer code ABCD?”, as well as authenticate itself to the monitoring service.
I’m both happy the ATECC chips exist and are pretty cheap, but also sad that one of their primary use cases is for authenticated printer ink cartridges.
I think I’ve got three main options for DIY remote monitoring.
We actually have two alarm systems. The first one dates back to the 80s, and has a big bell mounted externally to the house (with tamper sensors, naturally). The second one uses the SCW9047, wireless sensors, and a cellular modem for remote monitoring.
I haven’t yet discovered what the old alarm bell sounds like, but I’m looking forward to using it as a deterrent, regardless of how I end up implementing remote monitoring.
]]>My partner and I have not (yet) joined our finances. The money that each person earns and saves is theirs. I feel very fortunate that we have similar levels of disposable income, expectations for expenses, and (afaik) levels of responsibility. I suspect that’ll change sooner or later, but there hasn’t yet been a compelling reason to pool everything. In the beginning of our relationship, we mostly traded who would pay for things and never felt the need to be very precise about splitting things exactly equally.
Our situation did change when we purchased a home together. We decided to set up a joint bank account to auto-pay our mortgage & split large bills in half, and it quickly occurred to me that tracking who had contributed what would be complicated without the help of software. I’ve done a crash course on accounting once or twice, and had an idea of what I wanted.
Splitwise looked really close. It has a free tier, mobile & web apps, and makes it easy to track expenses between friends. The only sticking point was the shared bank account. How to track the liabilities it owed to each of us?? Spoiler: create another Splitwise user to represent that account (splitwise feedback site).
Once I’d set up a Splitwise user named after our bank account and added it to our household group (2 people and the bank account), here are the common scenarios:
You might be asking “why track the interest?” Especially since it amounts to maybe $20 a year.
I find it really useful because then the Splitwise calculation “amount owed by bank account” matches the balance of the bank account according to our bank. It’s nice when the numbers reconcile accurately, and helps build trust that the amount owed by each person is accurate. It’s helped find errors in amounts, as well as errors in the payer/split settings.
Interest is the use case that happens every month, but it also came in handy one time when we got an insurance refund check.
With “simplify debts” turned off, the Group Balances -> “Bank Account owes $XX in total” is then broken down by each person.
(It’s been a while since I’ve had a direct deposit in the account, and in the above screenshot all of the money and more in the account came from my partner. I’ve been making up for it by paying other bills)
Something that’s been nice about this setup is that it scales well. The primary purpose was to equitably split the mortgage, but as we’ve gotten used to it, it has been easy to add any one-off or recurring expenses.
I suspect we’ll have a shared credit card soon, which would make it even easier to split restaurants (etc). Instead of entering every meal (ugh, who has time for that?), just use the monthly statement to roll them up into a single entry that’s split in half between us.
Before we know it, we’ll have our joint accounts paying for everything that’s shared, we’ll work together on savings & retirement goals, and eventually erase the distinction between my money and hers. Until then, thanks Splitwise!
Late last year, Splitwise added limits on the number of expenses that a free account can add per day. We have maybe 10 per month, but since we don’t stay on top of it, this limit is painful. Not painful enough that we’d want to pay for a premium account ($5/mo or $40/yr), because there’s no way we get that much value from it.
I found a reddit comment that the older Android clients don’t enforce the daily expense entry limits. It turns out their publically documented API doesn’t enforce it either. So I wandered over to https://dev.splitwise.com/ and entered almost a year’s worth of expenses in an afternoon, using my API client of choice 🎉
]]>With that said, I’ve been less impressed with Dash as soon as I left the Apple documentation. This includes moderate usage of 3rd party libraries. It’s not necessarily a fault of the app, but more an expectation from me that I shouldn’t have to manage documentation. When you’re doing mostly vanilla Apple frameworks, enough functionality is built in. Apple’s documentation, while sometimes badly lacking, does a fair job at marking API availability and it’s possible to use the latest SDK to develop against older versions of the OS.
What I really, really want is to be able to view all the documentation for a project, and only the documentation for that project. Dash has “Search Profiles” that can be manually managed: adding / removing / updating docsets, and making it easy to constrain a search to a specific profile. I’ve done that when I primarily work on a single project: here’s the iOS docs and here are the handful of libraries it currently uses, which are updated infrequently. It 99% does not work for random projects that I find and want to make a change or two to. I have been super frustrated trying to poke at random Ruby projects, and trying to look up symbols. I think some of the problem is that other ecosystems are pretty granular, some that they publish a new docset for every minor revision, and (at least with Ruby) some that when classes are extensible there are too many results (right now, searching ‘ruby: string’ gets 19 results on my machine).
Just over two weeks ago, it occurred to me that there might be a better way. What if I could programmatically update a search profile, and have it match a project’s dependencies?
Unfortunately, Dash.app doesn’t expose the required APIs. You can ask for a specific docset & version to be installed, but that’s the extent of it. I’ve emailed with a feature request to do more, and the developer says it’s on his todo list.
While I was looking for a pre-existing solution, I found a ~10 line ruby script that installed all the documentation for a project’s gems, using bundler
. I was able to make an immediate improvement: using open -g
so that it didn’t bring Dash.app to the foreground every 3 seconds.
I’d like to think I’ve improved it further, in my very first gem, bundler-install_dash_docs
:
bundle show
This is written as a bundler plugin, because bundler is “the” dependency management solution for Ruby. Right now it requires user action, but in theory it could be done automatically if the plugin is installed: download new version of gem && install new documentation into Dash. As a visitor to the ecosystem, I’m not sure what a perfect workflow looks like. However, I have visions of a single command loading up all the documentation for a single project, and making it searchable while excluding anything else installed on the same machine. This isn’t a bundler-specific solution: I’d immediately want the same thing for any language / ecosystem with versioned libraries that Dash knows how to fetch documentation for.
I poked at Dash.app: the custom url schemes, the (basically empty) Applescript dictionary, and concluded anything else was impossible at this stage. That’s dumb, because Dash obviously stores the Search Profile information somewhere, and with enough effort it should be possible to edit it. On my second try, I found it in ~/Library/Preferences/com.kapeli.dashdoc.plist
(I think it’s odd most of the data is stored in Application Support
, but this is in Preferences
🤷♂️).
I’ve probably scratched my itch sufficiently for now, but it’s tempting to go further.
Why bundler? Because that’s what I was using when this occurred to me. Any combination of “versioned dependencies” and “robust Dash support” would benefit from something similar. Should it actually be a plugin to each dependency manager? Or is a Dash user going to want to install one tool that works similarly across ecosystems? (As I write that question, I feel like the answer is obvious, and not aligned with my current work. Oh well).
]]>GitHub Pages is a static site hosting service that takes HTML, CSS, and JavaScript files straight from a repository on GitHub, optionally runs the files through a build process, and publishes a website. [ref]
We recommend Jekyll, a static site generator with built-in support for GitHub Pages and a simplified build process. [ref]
I can’t remember if I heard of GitHub Pages or Jekyll (or maybe Octopress?) first, but a ruby-based static site generator with free build & hosting is totally sufficient for me, especially when it’s combined with GitHub’s authn/authz and git’s version control. I don’t really need GitHub’s 2FA protecting this content, but I almost cannot imagine creating content without version control and git
is the one I know the best at this point.
Jekyll provides the underlying static site generator, turning posts written in (mostly) markdown into the blog content. I benefit from a variety of plugins that GitHub Pages supports, but can’t add additional ones.
However, bare Jekyll would require a lot of additional work: creating the site structure, navigation, <head>
content, stylesheets, etc. That’s where the Jekyll theme comes in.
A flexible two-column Jekyll theme. Perfect for building personal sites, blogs, and portfolios.
I chose Minimal Mistakes for my theme. It has many configuration options, allowing pieces of functionality to be turned on/off and otherwise customized. ex: set up author profiles with various social media links, or choose between several ways of adding reader comments to pages. All that’s required is to edit the default _config.yml
Another customization option is to override specific pieces of the theme code: some that are “supported” and others that require manual changes when I update to a newer version of the theme.
An example of a “supported” extension point is a custom analytics provider, which requires a _config.yml
setting and putting the necessary code into _includes/analytics-providers/custom.html
(which is blank in the theme’s files and automatically included in the right place via the config setting).
The “unsupported” version is to simply copy a theme file into the blog’s repository, and make any/all changes desired. The local copy takes priority over the theme’s file. Unfortunately, it requires manually reconciling my changes with any changes in the theme when upgrading to a new version of the theme. I’ve done this with a couple of files, like _includes/scripts.html
to change the order of other includes.
As a result of these features and customization options, it feels like I spend more time working with the theme’s documentation and code than I do with Jekyll. The theme is also 100% responsible for the look & feel of the site.
I honestly don’t remember any details of setting up my custom domain. GitHub has documentation on the process, which I’m sure I’d follow if I had to set it up again.
I’m using Cloudflare for DNS on my domain and as a CDN for the blog. I started with Cloudflare for dynamic dns, and as far as I remember there wasn’t any reason not to keep using it when I set up the blog. I believe Cloudflare has a setting that forces https that’s enabled for the blog.
GitHub Pages makes this easy. I simply git push
to the remote, and GitHub builds and deploys a new version of the site. It’s been a while since I’ve encountered an error building, but logs are available for troubleshooting and it’s usually very fast.
It’s so easy that I’ve gotten into the habit of simply writing/editing posts on my iPad and pushing them live directly. Once they build, I can fix any typos or other mistakes and redeploy.
I don’t spend much time sitting in front of a computer during my personal time. I’m far more likely to use my iPad Pro. For the blog, I mostly rely on two apps.
Working Copy is a fantastic git client for iOS that I highly recommend. I’m not doing anything hard with the blog, being able to pull the latest code, make changes, and push is sufficient.
Working Copy introduced me to Editorial via the instructions for editing in another app. Editorial also comes with glowing reviews on MacStories. I set up some basic automation to interoperate with Working Copy, and a workflow to create a new post with some basic front matter and an (approximately) correctly formatted filename.
🤞 that both of these apps continue to be maintained. Editorial doesn’t look like it’s changing much, so I continue to be afraid it’ll stop working sooner or later, but so far so good.
Ahhh, here’s my opportunity to overcomplicate things! I blame most of the complication on an old project called Pow, which has been replaced by puma-dev
Puma-dev is the emotional successor to pow. It provides a quick and easy way to manage apps in development.
I like puma-dev because it combines two features: reverse proxy and local DNS. I don’t know if it’s best-of-breed these days, I didn’t spend long looking.
puma-dev provides a reverse proxy, and it’s configured by adding files to ~/.puma-dev/
, with a variety of possibilities:
config.ru
out of that directory, and manages the associated rack applicationpublic/
, for all othersport
address:port
For local development, this is enough configuration for me. I love how simple it is. puma-dev listens on ports 80 and 443 by default, and uses a wildcard cert to provide trusted TLS connections. The file/symlink’s name (ex: blog
) is mapped to the domain (ex: http://blog.test/
)
Notice that rack
applications are provided with some extra features. This is because the tool comes from the ruby community, but IMO it remains useful for any local web development work I’m doing.
The other half of the magic is providing a DNS resolver for the chosen top level domain (ex: test
), mapping lookups to 127.0.0.1
. Pow ran into trouble because it was using dev
and then Google purchased that TLD! So we’ve all learned our lesson and the default is now .test
- one of the 4 reserved TLDs - but good luck getting everyone to conform and so it’s configurable.
I continue to be amazed at how easy this is to setup: just drop /etc/resolver/test
onto disk with the nameserver
and port
(man page)
puma-dev
listens on all interfaces when it installs itself. I’ve manually changed my install to only listen to the localhost interface, and filed a feature request with the project. This prevents other machines accessing my WIP development code (which for the entirely static blog would not be particularly worrisome), and makes me feel better about having it running all the time.
Since puma-dev
manages the app lifecycle, I need a way to control it. My most common operation is to touch tmp/restart
in the blog’s directory, which causes puma-dev
to shutdown the app. It’s started up on the next request, and that makes it easy to pick up _config.yml
changes.
Transform your Jekyll app into a Rack application.
I use rack-jekyll for automatic generation of the static site files. Since puma-dev
(and pow
before it) knows how to launch / shutdown rack
applications, it becomes a pretty easy workflow to edit files, load them in the browser, and then know the process will stop running soon after I’m done.
I’ve been living with a warning from GitHub that my repo has an insecure version of rack
, because the gem hasn’t been released in a long time, but using the latest version via git fixes that.
I also ran into some weird behaviors when running through puma-dev
that were solved by requiring github-pages
in my config.ru
. It loads a variety of plugins, changes some configuration settings, and basically ensures I’m building similarly to the way GitHub Pages will when I push the code.
I’ve been poking at the jekyll config passed into the rack app, turning up the logging and showing any/all unpublished/incomplete posts. I don’t yet know if it’s better to see what’s in progress, or better to have a live preview of production. Maybe that’s something I change as needed.
jekyll-compose provides some basic jekyll
command line additions that make it easy to create drafts & posts with specific front matter, and correct names. I definitely forget that this exists, and end up either creating posts through my workflow on Editorial or copying from an existing file.
However, if I remember or if I re-read this post, bundle exec jekyll {post,draft} "[title]"
seems like a better way to go about it. The publish
, unpublish
, and rename
commands look good too.
How I would probably reinstall this on a mac
git
bundle install
from blog’s repo to install the necessary gems.~/Library/LaunchAgents/io.puma.dev.plist
is binding to 127.0.0.1
instead of 0.0.0.0
puma-dev link -n "blog" [path]
to add the symlink for puma-devWell, I’ve written what I wanted: a tour of the various moving pieces and why each one is important to me. I think this is what I’ll find valuable in the future, but now I have questions:
🤷♂️
]]>I jumped on the UniFi bandwagon in 2017, after we started getting 802.11ac devices. I like that it’s independently upgradable, and that I can run a single wire to a central location to achieve decent Wifi coverage at our house. The fact that it took me two years before I chose that spot and ran that wire in our new home is a different conversation 😭. I expect to get many years out of it, and hope that I’ll be able to just drop in a replacement when the time comes.
Until a couple days ago, I’ve been using the same router since 2009 (D-link DIR-825) 1. It met our needs: gigabit ethernet & adequate routing speed. However, when COVID hit and we started video conferencing from home more often, I was entirely unsatisfied with Xfinity’s 5 Mb upload speed. So we upgraded to the 600/15 plan, and subsequently found out the router couldn’t support routing packets at the speed required to saturate our download. Honestly though, it wasn’t a huge issue for me since we were satisfied and I’d mostly upgraded for the 3x faster (but still miniscule 🤬) upload speed.
For a replacement, I wanted gigabit ethernet, a USB port (for the pi-hole), and solid OpenWrt support. Reviews of consumer routers focus quite a bit on wifi capabilities, which doesn’t matter for us because of the UniFi, and that made it harder to pick something. I found GL.iNet’s product line while looking for routers that run OpenWrt natively, and picked one that looked reasonable: the Brume. It may end up being the wrong choice (I haven’t yet verified if it saturates our download), but if I do end up replacing it I think I still like the form-factor as a travel router.
I shied away from the UniFi / Mikrotik (& others?) class of products because it seemed like they (rightly) charge a premium to support their custom software development, and I think my needs are met with the open source & free alternatives. Additionally, I know that my desired setup is possible with OpenWrt.
It is still true that dnsmasq
is one of my favorite features of our local network (ad blocking is probably #1 these days), but it’s no longer running on the router. I knew that network-level ad blocking worked by overriding DNS entries, and I was pleased to see that the Pi-hole software project is built on top of dnsmasq
, because it meant I wouldn’t have to give up local host name resolution.
However, a conundrum: in order for the DNS server to serve results based on local host names, it has to know the mapping between hostnames and local IP addresses. The easiest way to do that is for the Pi-hole to be the local DHCP server. And that means the local network is “broken” if the server is down or unreachable - which is an argument for running that software on something hardwired to the network, instead of connected via wifi. But the Pi Zero doesn’t have a built-in ethernet port.
Here’s where USB enters the picture. The Pi Zero has the ability to plug into a host via USB, and present itself as a networked device. Some search terms are “Ethernet Gadget” or “USB Gadget”, and I’m using the g_ether
module. This is a very well documented configuration, and (currently) requires just a few changes to /boot/config.txt
, /boot/cmdline.txt
, and then configuration of the resulting usb0
interface with appropriate network settings (in my case, a static IP on the local subnet). The Pi-hole software wants you to set up that interface through its installer (or subsequently via pihole reconfigure
), which is nice because it updates the DHCP settings at the same time.
I’m pretty happy with the elegance of this configuration. The router has a USB port, and as long as the router’s powered up so is the Pi Zero. I’ve found the software to be incredibly stable. IDK how USB 2.0 compares to wifi with respect to speed / latency / throughput. I haven’t cared to try to benchmark it, but as far as I can tell this hasn’t added any significant latency to our internet usage.
If I remember correctly, I struggled a bunch the first time around because I was trying to set up both the Pi and the router with ethernet over USB at the same time. This time around I put the Zero on our wifi via /boot/wpa_supplicant.conf
, ensuring I could access it regardless of the success/failure of the ethernet gadget setup and making it easy to download/install software before finishing the usb0
interface setup. Then I used my Mac (which “just works” when the Zero is plugged in via USB: it shows up as an Ethernet/RNDIS device in the Network system preference pane) to double check that the interface came up as expected.
One important thing to remember is that only one of the Pi Zero’s USB ports works for this: the one closer to the center of the board. I’ve blocked the other port with some tape to prevent making that mistake again.
I remembered having a lot of trouble with this the first time. It’s similar to setting up smartphone tethering (ie: I have a USB device that I want to treat as a network interface), and I found lots of conflicting / overlapping instructions. It’s not the same as tethering, because you want the USB device to be part of the LAN instead of serving as the WAN interface, but that actually makes it easier. This time it was super easy, and I was able to do it all through the UI 😱.
kmod-usb-net
might be sufficient; I went with kmod-usb-net-rndis
(which depends on the former) because I believed the extra module wouldn’t hurt and might help. The Software tab of the GUI made it easy, or use opkg
on the command line. I chose to reboot, which may not have been necessary.usb0
network interface to show up, until I realized it’d happen automatically once there was something plugged in 🤦♂️.usb0
interface to the (already existing) br-lan
“Bridge Device”. I dimly remember having to (or thinking I had to?) create the bridge myself the first time around, and spending lots of time reading the ifconfig
man page. I don’t know if that’s a software change, a hardware-specific difference (since this router shows each internal ethernet port as a different interface), or an extra step I didn’t actually have to do last time. As the step I was dreading the most, I was so grateful when it was accomplished with a handful of clicks.There’s not much more to it, but here are some settings that go along with this setup.
.1
and the Pi as .2
), by this point it’s probably already done, but I’m covering my bases./etc/pihole/custom.list
(or through GUI at Local DNS -> DNS Records
)DNS -> Never forward non-FQDNs
(which sounded like a good setting based on the name). However, it means the Pi-hole treats itself as authoritative for the domain name, and won’t go to the actual authoritative name server to pick up external records.One final step: making it easy for everyone in the house to turn ad blocking off. We don’t use it often, but unfortunately there are some apps and websites that break if their advertising domains aren’t available. More often than not, it isn’t even an intentional “please turn off your ad blocker” nag screen, it’s just some page that doesn’t handle errors, or videos that hang forever, or whatever.
My solution was to use the Pi-hole Home Assistant Integration. This provides a password-free mechanism to turn off ad blocking, and it’s easy to access on any of our devices, or via voice assistant. I paired it with an automation that automatically turns ad blocking back on after 5 minutes, and IMO it’s been working great.
Now that my partner is WFH full time, having a reliable network is very important. I’m going to upgrade the software and keep the old hardware as spares that can be swapped in.
Edit: Looks like my (ancient) router is not quite as easy to setup. I’ve tried installing kmod-usb-gadget-eth
, and then kmod-usb-gadget-cdc-composite
, but still no luck on getting usb0
to appear on the OpenWrt device. So now I feel better that it was likely much harder last time.
Worse, I’m not sure where to go from here. modprobe g_ether
was a thing suggested somewhere, and that results in:
[ 640.993377] udc-core: couldn't find an available UDC - added [g_ether] to list of pending drivers
lsusb
successfully identifies that there’s an Ethernet gadget connected, but nothing else seems to happen:
Bus 001 Device 002: ID 0525:a4a2 Linux 5.10.52+ with 20980000.usb RNDIS/Ethernet Gadget
Worst case, I could simply re-enable the router’s DHCP server and use one of the several publicly available DNS servers, but having the spare hardware is cheap insurance and it’d be nice to keep blocking ads while I figure out how to fix things.
True, but with a caveat. I bought mine in July 2009. It turned out to be Revision A1, which isn’t supported by DD-WRT nor OpenWrt. I bought my parents the same router (but a later hardware revision) in 2011, which they outgrew years later and I took off their hands. So I switched to that physical hardware when I installed an alternative firmware, but I was using the same model for 12 years. ↩
I’d had my driver’s license for about 6 months. I liked driving my car, I had friends who worked for a local pizza restaurant, and I had visions of zipping around town delivering pizzas quickly. Could I drive faster than the speed limit? Yes! Surely that’s what it would take to be a good delivery driver. I’m being reductive for effect, but also because I hope it’s a good first-order approximation of a typical person’s perspective.
It turns out, perhaps unsurprisingly, that driving faster is not the key to success. Personal heroics were not enough to feed the city.
How it actually worked:
Ideally you’d take the subset of orders that were done around the same time, and which were located in reasonable proximity to each other. IMO, this was the hardest part of the job. “Should I delay these two orders for the 5-10 minutes it’ll take the kitchen to make this third one?” Depends on time, distance, and the other orders that the other drivers need to take. There wasn’t an easy decision tree, and even after 3+ years of experience, I still got this wrong.
I don’t think I was mature enough at the time to realize and accept that inevitably, someone’s going to get a bad experience. I believed in the system and the people: we have enough delivery drivers to satisfy demand for the day, we’ll make the right choices of which deliveries to group together, and there’s room for coworkers to make selfish decisions. It probably would have been easier if I could identify and accept “oh, that house has bad luck, their pizza is going to be late because they ordered at the wrong time ( sometimes down to +/- 10 minutes)”. I wanted to do whatever we could to make it work.
Selfish decisions? Oh yeah. Layered on top of the complex interplay of “which orders do I need to take in order for all the deliveries to arrive as efficiently as possible” was each individual’s “which orders do I want to take in order to maximize my earnings for the evening.” If you’d had the job long enough, you’d recognize good customers and bad customers (based on historical tip amount), and use that to influence your choice of deliveries. You’d definitely delay some orders if it meant you got a house that gives a good tip, and you’d happily skip a house that never tips if possible. I consider myself fortunate: I was living at home and I wasn’t trying to pay a mortgage, tuition, or a drug habit, and therefore I usually only worried about delivering pizzas effectively.
I was surprised. It wasn’t just selfishness, this was very clearly a zero-sum situation. “Oh, you {took,skipped} a delivery that {didn’t,did} make sense with the rest of your run, because of their tipping habits? What about the rest of us?” There were acceptable levels of selfishness, and if you weren’t operating on the same level, it was your fault for not playing the game correctly.
It would have been simpler if the system only cared about the customers, but it sure made for an educational experience of a self-organizing system with a variety of actors.
Postscript from Feb 2022: Well, I don’t know that I really explained any of the lessons that well. After a long break from this blog, I found this sitting unpublished. If I had a higher quality bar, maybe I’d leave it unpublished until I reworked it…
]]>I assert that the engineer who codes a feature is not going to find bugs that they never even considered. It’s in one of their blind spots.
Sure, they can write some automated tests. They might even get 100% code coverage. But the bug that doesn’t have any code to cover it is unlikely to occur to them while writing test cases and their inputs. It might, if (for example) they’re writing boundary condition test cases and realize they forgot to check boundaries in the code. It probably won’t though, that’s why the bug is there in the first place. It might be attributable to the size of your codebase, and the complexity of the change. Also consider their experience level, both as an engineer and with this particular codebase.
They probably did their deep thinking at the beginning of implementation. They’re coasting downhill at the end, just trying to prove that the code does what they wanted it to do (TDD doesn’t change this). Maybe they’re already thinking about the next ticket, or who to assign the code review to.
Okay, you’ve got a bug or defect. Who’s going to find it? And what will that cost you? Conventional wisdom says the earlier in the development cycle that a bug is caught, the less it costs the company. Bugs also have different severities. I’ve chosen to work at companies that build software for businesses, and some bugs have direct financial repercussions for the company or our users if the bug reaches production.
Customers are good at finding bugs. They’re (hopefully) using your product regularly, and (probably) in ways your dev team never considered. You might build systems that use a phased rollout and monitoring to detect problems in an automated way. You might have a set of beta customers with a more direct line of communication to the dev team to respond to issues faster, and prevent them from reaching your entire customer base. Those customers are still subject to any ill effects from your bugs, and they’re not going to be very understanding if you corrupt their data or prevent them from issuing paychecks to their employees.
How do you catch bugs prior to production? I’ve seen a variety of techniques and names. To be extremely reductive: by having an employee use the product in a way they think the customer will. They have varying levels of formality and thoroughness. You might have employees dogfooding the product or host bug bashes. Did you set up processes to make it easier to report bugs because the cost/benefit ratio of reporting problems to other teams was too high? You might discover bugs while demoing the feature (low stakes: during sprint review, high stakes: to senior leadership or at the company all hands). Maybe the product manager sets aside time to do their own testing.
I think these are all valuable. My main concern is that they’re largely undirected and ad-hoc. Perhaps a bunch of people checked negative numbers, but your company isn’t diverse enough to have someone who tried on an iPhone set to use the Hebrew calendar. They were almost certainly unable to test on a leap day, or during a daylight saving time change. How many of your employees are moving real money through the product, compared to looking at abstract numbers on a screen? I think you’ll find lots of shallow bugs, but deeper bugs are more likely to escape detection.
What about code review? Does a second engineer reading the code for the feature help? Absolutely. A knowledgeable team member can certainly identify problems. However, I think this is influenced by the company culture toward code review, and what the stated purpose is. For example, if your “How to Code Review” documentation says “code review is not meant to find bugs”, you’re going to have a problem. Or if code review is seen as a formality, perhaps mandated for compliance reasons (ex: prevent lone bad actors from inserting obvious backdoors).
Even with a thorough review, in my experience, it’s hard to see what isn’t there during code review. You’re almost always looking at a diff of the changes, and focusing on what’s been added. If the PR deletes code, you have a chance to find regressions by looking for edge cases that used to be handled, and finding where the new version handles that edge case (or doesn’t). What can you do about the edge case that’s mentioned just out of view in the diff tool, or never even hinted at in the code? I think it takes a mindset shift and a higher level of thinking: what is the problem being solved, what are edge cases I can think of, and have they been addressed? I love reviews by engineers who take the time to do this, but it takes extra effort and is aided by experience (ex: if you’ve never run into a DST bug, good luck finding one). It’s hindered if your PR description is just a link to the bug tracker and all your commit messages are noise, or if deep and thorough reviews aren’t reinforced by the organization and team. It’s also less likely to surface issues due to interactions with components owned by other teams.
I believe this is the real value of having someone dedicated to assuring the quality of the product. A second individual poking at a feature’s implementation whose incentives are tied to making sure it works right. Someone who’s considering “how can this break” from the beginning, instead of “what do I have to do to get this working”. Someone with a wider and deeper perspective, who’s focused on being an expert in the weird interactions and darker corners of the product.
Pair programming might be a reasonable alternative to a separate role (I don’t know). I like that it adds a second person thinking deeply about this particular problem, which I think is key to high quality. And a pair with different experience levels could benefit from both the experience to avoid subtle issues and the increased collaboration driven by questions and explanations.
Every bug is different, and every company is different, so I’m not saying every company needs a QA department. However I think it’s important to consider how you’re filling their role (or not!), and what that’ll cost. If you lose someone’s progress in a game, that’s one thing. If you ruin someone’s business, that’s a completely different level of bug.
As your product grows in scale, the potential impact of a bug grows too. I think this should lead to increasingly risk-adverse organizations. How you choose to manage that risk is a complicated decision. I really like the idea of explicitly paying specific people to ensure the product quality improves.
]]>I subscribed to Adafruit’s AdaBox, and received a PyPortal last year. However, I hadn’t found anything I wanted to display. There are a bunch of neat ideas, but AQI during wildfire season is the first that’s really made sense to me:
Of course, I’m not the first one to think of it. It’s even one of the example projects from Adafruit: PyPortal_AirQuality. I signed up for an AirNow account, ran the sample request, and realized it was showing the forecast for tomorrow. Not what I’m looking for. Some poking around found that AirNow also has a Current Observation endpoint, so I swapped that in, and declared victory.
Until about two hours later when the wind shifted and the smoke arrived. It quickly became apparent that the AirNow data was significantly lagging, and wasn’t suitable for my purposes.
PurpleAir is my go-to location for crowd-sourced, hyper-local air quality, and I’m lucky enough to have several sensors very close to our house. So, I went looking for their API information, and found it in a google doc. Later I realized that every sensor on the map also has a “Get This Widget” popup with the pre-constructed JSON url for that sensor.
Unfortunately, the data doesn’t show the AQI value, it shows the underlying particle reading. I did the simple thing, and adapted python-aqi to calculate the AQI (verifying against PurpleAir’s calculation to make sure I was doing it correctly). With the right algorithm set up, I started averaging from multiple sensors.
It doesn’t support anything fancy, like the conversions for wildfire smoke, but I think it’s reasonable.
Project available at e28eta/pyportal-aqi
I didn’t spend very long studying the PyPortal library, but I think it’s interesting. It takes the “fetch some data & display it on screen” task, and abstracts it into a declarative process. However, the provided API breaks down in the PyPortal_AirQuality example project, and it has to be augmented with procedural code to change the background color based on the AQI.
I don’t have much experience designing APIs for beginners and non-programmers. So I don’t feel competent to judge whether this is a “good” design approach, but I was bothered by the mix that I ended up with. OTOH, this will never grow into a complicated project, and expediency is more important to me.
]]>It’s an interesting challenge trying to find software when you don’t know what it’s called. Even more so when I didn’t know which features would be most important to me. I found a bunch of candidates, but I feel really fortunate that I stumbled onto Zettelkasten software, specifically Obsidian.md.
Obsidian is a powerful knowledge base that works on top of a local folder of plain text Markdown files. In Obsidian, making and following [[connections]] is frictionless.
“Powerful knowledge base” and “frictionless” are very general claims. What do they mean, and how accurate is it?
I believed I was looking for personal wiki software. I wanted to create a set of pages, and interconnect them. I also wanted to be able to put them into hierarchies. I’m also somewhat spoiled by the editing experience of IDEs. Obsidian delivers, and it’s free.
md
file and will use that for an auto-completion list when creating a link (same as open by name)
It does have some problems, but so far they’re minor annoyances. Like the fact it’s cross-platform software, and doesn’t get everything right for Mac software 😢. Or the fact that I find the multiple editor panes annoying to control & difficult to achieve what I want with them.
I’ve done some file editing via Working Copy on iPad. I did miss features like auto-completion of links and renaming support, but it’s workable.
Without good linking & navigation support, I might prefer fewer documents. Instead of very granular articles, I’d be tempted to co-locate a lot of information, making it easier to read/browse and use Find
within the document.
Another approach is a structured database. Define different entity types, and required/supported fields for each. I think this is more likely to be useful for a DM. As a player, I know very little about each new thing, but as the game progresses I’ll learn more. Compare that to the DM, who might want to (for example) be able to see all the priests of a various deity, and gets a lot of value out of structured data.
Native vs web. I’m transcribing a session’s worth of notes at a time. This means a large batch of changes across the whole encyclopedia at once, and reducing friction is important. I think it’ll be nice to see all those changes together, instead of just versioned changes to each entity. It feels very natural for this to be a native app. As a developer, I’m very familiar with git, and so are most of the other people I play with. This started as a personal project, but if I share it with the rest of the group I may end up regretting excluding our non-technical party member (or I’ll need to figure out some way to make it accessible to them).
Using github gives me authn/authz for free, as well as great uptime and sharing. But there’s no way it scales. If I had multiple editors, conflicts would be a PITA. Plus the huge barrier to entry that git has.
I haven’t spent much time evaluating other Zettelkasten software (like Roam), but I suspect they’d meet my needs similarly. I like that Obsidian is free and I control the storage/syncing of the data store, so I probably won’t be looking for a replacement anytime soon.
]]>